sudo|Xanthippe

But once I caught him when he was open like Silenus' statues, and I had a glimpse of the figures he keeps hidden within: they were so godlike — so bright and beautiful, so utterly amazing — that I no longer had a choice: I just had to do whatever he told me.

Tag: software

Web browsers for Raspberry Pi (compiling Links)

Sometimes we want to use internet browser on Raspberry Pi, there are many that we can install and run, but most of them will be unusable due to theirs relatively high requirements. There are some nice alternatives to popular browser though. I consider browser such as Firefox, Chromium and Opera totally unusable on Raspberry Pi (even though you can run them). There is a second category of browsers, they are written usually especially for Linux, for example: Epiphany, Iceweasel, Icecat, Konqueror, Dillo. From these the last one seemed fastest for me. There is also option to use browser from third category: text browsers. Most popular are Lynx and Links. Lynx is great when you don’t care about graphics but sometimes we just need to see some images. There is nice solution for that. We can use Links in graphic mode.

Typing pacman -S links in console won’t help us, it won’t run in graphic mode because it wasn’t configured to do that at the time of compilation. We need to compile it on our own. Go there http://links.twibright.com/download.php and download package. When you’re ready unpack it with (I’m not sure if Arch has tar by default, if now: pacman -S tar):

tar -zxvf links-2.7.tar.gz

Before we start we need to resolve dependencies and other necessary things. Let’s begin with compilator and make program, then libraries:

pacman -Syu gcc make

pacman -S libjpeg libtiff zlib gzip

Now go to directory where you unpacked links. Type:

./configure –enable-graphics

make

sudo make install

Now start browser with:

links -g http://www.google.com

Conclusion: for me Epiphany is slower than Dillo which has equal speed to Links which I found more convenient. I also seems to me that Links is more responsive even though Dillo takes less ram when not in use.

Epiphany:

epiphany

Dillo:

dillo

Links in graphic mode:

links

There is how it looks in ps -aux:

solusip+   331  3.1 13.2  38940 24808 pts/1    S+   07:57   0:11 dillo
solusip+   220  0.7 13.3  36092 25044 ?        Ss   07:50   0:06 links
solusip+   240  9.5 28.2 298048 53008 ?        Ssl  07:56   0:41 epiphany


Archlinux on Raspberry Pi: sudo and window managers

There are couple thing you can do with your Arch to make it more adjusted to your preferences. This time I’ll show you how to configure sudo and install most popular window managers. Remember that you can get such configuration on every computer, not only on RPi.

Let’s start with sudo. Login as root and type

pacman -Syu sudo

After installing package type visudo. There will be ran vim version made especially for editing sudoers file. Right after first page you’ll find such line:

root ALL=(ALL) ALL

Go to line under it and press ‘i’ key on your keyboard to switch to insert mode. Then type:

your_user_name ALL=(ALL) ALL

Then press Escape, and type:

:wq

Press enter. That’s all. Relog to your account and check if sudo is working.

Now we’re ready to install a window manager. There is difference between it and desktop environment. I wanted to work with it on Raspberry Pi mainly because of its speed. Any WM is many times faster that any desktop environment. I never used them before and now I decided to start with FluxBox. So let’s install it. Log to user account and type:

sudo pacman -S fluxbox

After fluxbox is installed edit .xinitrc file in your home folder.

nano .xinitrc

exec startfluxbox

Save file and type startx.

You should see default fluxbox’s screen. Now it’s time to configure it. Let’s begin from installing program called feh. It’s responsible for handling images. Right click on your desktop and select xterm. Then type:

sudo pacman -S feh

I guess that we need a file manager. There are many options, I’ve chosen pcmanfm:

sudo pacman -S pcmanfm

screen2

Now let’s deal with fluxbox’s menu. I used program called menumaker to generate menu containing all installed applications.

sudo pacman -S menumaker

mmaker -f FluxBox

Now you’ve got all applications in menu. You can still edit entries order. To do that edit with your favourite edit that file: ~/.fluxbox/menu. For example:

nano ~/.fluxbox/menu

screen3

screen4

We’ve got most basic programs now. Let’s make FluxBox prettier. There is nice website you can get fluxbox’s themes: http://customize.org/fluxbox. It would be great to do everything on Raspberry Pi. Install web browser and go that site (I installed Epiphany).

When you’ll download a style unpack it to ~/.fluxbox/styles and then choose it from menu. Now it looks really better. But we still have no icons in files manager. We can install for example these:

pacman -S tangerine-icon-theme

sudo echo “gtk-icon-theme-name = “Tangerine” >> /etc/gtk-2.0/gtkrc

screen5

screen6

Well it’s time to add a wallpaper. First get any. Then exit FluxBox. We need to edit .xinitrc again.

nano .xinitrc

Put before exec startfluxbox that:

fbsetbg ~/Documents/wallpaper.jpg

This is how my FluxBox looks after all these operations.

screen7

Archlinux on Raspberry Pi: installing xorg and LXDE

After 3 months of using Raspberry Pi my SD Card has broken. I bought new one and decided to install Arch this time. There is disc image with preconfigured system: http://www.raspberrypi.org/downloads. We could of course install it on our own, but I have no special needs, so this package is ideal for me. Let’s download it and write it on SD Card. To do that we need to determine localization of new card. You can use ls /dev/sd* and check what’s new or simply use GParted. In my case it’s /dev/sdb. To write img to disc use program called dd. I did it in that way:

sudo dd if=~/archlinux-hf-2012-09-18.img of=/dev/sdb

If your card is bigger that 2GB you should also resize / partition. You can do it easily with GParted. Just resize it to disk limit. Now we are ready to boot our RPi. Plug the ethernet cable and boot device. I’m doing everything, till the moment of xorg installation, via SSH, without using its video ports. Check device’s IP and connect. It my case it was root@192.168.0.18 (simply type ssh root@192.168.0.18 – you need to have openssh installed). First part of that address is the account we want to connect with. That is actually the only account in that system now. Its password is root, so right after connecting, type passwd and type doubly the new one.

After doing that we’ll need to update our system. To do that type:

pacman -Syu

Now we are ready to install xorg. Type

pacman -S xorg

When it’ll ask about selection, don’t give anything on input, just press enter. After installing xorg, install 3 things more: xorg-xinit (to be able to use startx), xorg-twm and xterm (to test if xorg is running properly). Do it with:

pacman -S xorg-xinit xorg-twm xterm

Now you should connect your Raspberry Pi to an video output. When you’ll be ready use that command (not with ssh anymore):

startx

You should see something like this:

xorg

To close it, type exit on left terminal or, in case you don’t have your mouse connected, type pkill x on this active by default.

Now it’s time to create a new user. It’s wise not to use root account when using x. To do that use that command (XYZ will be the name of your user):

useradd -m -g users -G wheel,storage,power -s /bin/bash XYZ

Now set password for new user:

passwd XYZ

No it’s time to install lxde. It’s probably the lightest environment. You can choose alternatively xfce (which I prefer) but it’ll work a bit slower. If you decided to use lxde, type:

pacman -S lxde

When installation is completed, log out (by typing logout) and log on your newly created user.

Now type:

ls -la | grep .xinitrc

If there’s such file, you need to remove it by typing:

rm .xinitrc

Now we’re going to create a new one. Type:

cat >> .xinitrc

And then:

exec startlxde

When you’re done, press Ctrl + D. Make sure that your file contains only that line. Now it’s a big moment. Type

startx

and wait for LXDE to start.

That is the most basic way of doing it. Your LXDE screen should look like this right after installation:

lxde

Transforming Raspberry Pi to a game console

Before yesterday I’ve never used Python. I was actually forced to do it because of the fact that it is now official language of Raspberry Pi. After spending one day with it I have to say that it’s amazing and I would recommend it for anyone who want to start programming (not advanced programmer here actually). Yesterday I modified already written Pong clone to use GPIO interface and move paddle when I push a button. Then I thought that it is rather senseless because keyboard can do it better. And then I come up with an idea that it would have sense if there were two players using custom controllers. I decided to write my own Pong clone which I called PiPong! At the end of that post you’ll find a source code. To run it you’ll need to images – for paddle and for ball. You can download package there: http://sourceforge.net/projects/pipong/files/. You can test it also on your computer. To do that, run keypong.py instead of pipong.py, which is made for Raspberry Pi. You’ll need also Pygame which can be downloaded there: http://www.pygame.org/download.shtml If you’re using a 64-bit version of Windows with Python 2.7 or 3.x, there is a binary for you: http://www.lfd.uci.edu/~gohlke/pythonlibs/#pygame

This is how it looks:

# www.sudoxanthippe.wordpress.com
# PiPong!

import pygame, random
from pygame.locals import *
import RPi.GPIO as GPIO
pygame.init()

def menu():
	    
    pygame.init()
    display = True
    
    # Setting resolution
    screen = pygame.display.set_mode((800,600), 0, 24)
    # Hiding mouse
    pygame.mouse.set_visible(False)
    # Setting window's caption
    pygame.display.set_caption("PiPong!")
    # Displaying starting label 
    label = pygame.font.SysFont("Tahoma", 25).render("Press ENTER to start!", 1, (185,0,0))
    # Checking size of the Surface
    background = pygame.Surface(screen.get_size())
    # Returning converted size
    background = background.convert()
    # Filling background with colour
    background.fill((45,45,45))
    
    while display:
        
        for event in pygame.event.get():
        # Checking if RETURN key was pressed    
            if pygame.key.get_pressed()[pygame.locals.K_RETURN]:
		# Go further
                    display = False
        
        # Dealing with the colours of the menu
        color = (200, 200, 200)
        rectangle = pygame.Surface((265, 50))
        rectangle = rectangle.convert()
        rectangle.fill(color)
        # Refreshing menu elements
        screen.blit(background, (0,0))
        screen.blit(rectangle, (264, 280))
        screen.blit(label, (280, 290))
        
        # Update the full display Surface to the screen
        pygame.display.flip()
        
def game():
	pygame.init()
	display = True
	
	# Setting resolution
	screen = pygame.display.set_mode((800,600))
	# Hiding mouse
	pygame.mouse.set_visible(False)
	# Setting window's caption
	pygame.display.set_caption("PiPong!")
	

	# Checking size of the Surface
	background = pygame.Surface(screen.get_size())
	# Returning converted size
	background = background.convert()
	# Filling background with colour
	background.fill((45,45,45))
	
	# Loading images
	sprite_pad = pygame.image.load("pad.png")
	sprite_pad_mirror = pygame.transform.flip(sprite_pad, True, False)
	sprite_ball = pygame.image.load("ball.png")
	
	# Converting images to sprites
	rect_pad1 = sprite_pad.get_rect()
	rect_pad2 = sprite_pad_mirror.get_rect()
	rect_ball = sprite_ball.get_rect()
	
	
	# Ball movement speed
	hspeed = 0
	vspeed = 0
	while hspeed == 0:
		hspeed = random.choice([-4, 4])
	while vspeed == 0:
		vspeed = random.choice([-4, 4])
	slower = 1
	
	score1 = 0
	score2 = 0
	
	pad_y = 300
	pad_y_2 = 300
	
	while display:

		# Ball movement
		slower -= 1
		if slower == 0:
			slower = 5
			
		# Pads movement for keyboard
		if pygame.key.get_pressed()[pygame.locals.K_s]:
			if (pad_y <= 500):
				pad_y = pad_y + 4
		if pygame.key.get_pressed()[pygame.locals.K_w]:
			if (pad_y >= 10):
				pad_y = pad_y - 4
		if pygame.key.get_pressed()[pygame.locals.K_DOWN]:
			if (pad_y_2 <= 500):
				pad_y_2 = pad_y_2 + 4
		if pygame.key.get_pressed()[pygame.locals.K_UP]:
			if (pad_y_2 >= 10):
				pad_y_2 = pad_y_2 - 4
		
		# Pads movement for GPIO		
		if GPIO.input(22):
			if (pad_y <= 500):
				pad_y = pad_y + 4
		if GPIO.input(24):
			if (pad_y >= 10):
				pad_y = pad_y - 4
		if GPIO.input(21):
			if (pad_y_2 <= 500):
				pad_y_2 = pad_y_2 + 4
		if GPIO.input(19):
			if (pad_y_2 >= 10):
				pad_y_2 = pad_y_2 - 4			
								
		# Setting sprites position
		rect_pad1.left = 25
		rect_pad1.top = pad_y
		rect_pad2.left = 750
		rect_pad2.top = pad_y_2
		
		# Score refreshment
		score1_str = str(score1)
		score2_str = str(score2)
		score = pygame.font.SysFont("Tahoma", 18).render(score1_str + ":" + score2_str, 1, (155,122,222))
				
		# Ball movement
		if hspeed < 0:
			if (rect_ball.left + hspeed > 5):
				rect_ball.left += hspeed
				GPIO.output(23, False)
			else:
				rect_ball.left = 400
				rect_ball.top = 300
				score1 = score1 + 1
				GPIO.output(23, True)
		else:
			if (rect_ball.left + hspeed < 750):
				rect_ball.left += hspeed
				GPIO.output(23, False)
			else:
				rect_ball.left = 400
				rect_ball.top = 300
				score2 = score2 + 1
				GPIO.output(23, True)
		if vspeed < 0:
			if (rect_ball.top + vspeed > 5):
				rect_ball.top += vspeed
			else:
				vspeed = -vspeed
		else:
			if (rect_ball.top + vspeed < 550):
				rect_ball.top += vspeed
			else:	
				vspeed = -vspeed

		# Collision detection
		hit = False
		# Pad1
		if ((rect_ball.left >= rect_pad1.left) and \
		(rect_ball.left <= rect_pad1.left + rect_pad1.width) and \
		(rect_ball.top >= rect_pad1.top) and \
		(rect_ball.top <= rect_pad1.top + rect_pad1.height)):
			hit = True
		# Pad2
		if (rect_ball.left >= rect_pad2.left-27) and \
		(rect_ball.top >= rect_pad2.top) and \
		(rect_ball.top <= rect_pad2.top + rect_pad2.height):
			hit = True
			
		# When collision is detected
		if (hit == True):
			if (rect_ball.left > 400):
				rect_ball.left = rect_ball.left - 5
			else:
				rect_ball.left = rect_ball.left + 5
			hspeed = -hspeed

		if pygame.key.get_pressed()[pygame.locals.K_ESCAPE]:
			display = False
		# Killing process
		for event in pygame.event.get():
			if event.type == pygame.QUIT:
				display = False
			if pygame.key.get_pressed()[pygame.locals.K_RETURN]:
			# Go further
				menu()
		
		# Dealing with the colours
		screen.blit(background, (0,0))
		screen.blit(sprite_pad, rect_pad1)
		screen.blit(sprite_ball, rect_ball)
		screen.blit(sprite_pad_mirror, rect_pad2)
		screen.blit(score, (375, 555))
		
		# Update the full display Surface to the screen
		pygame.display.flip()
		
		
def main():
	#GPIO initialize
	GPIO.setmode(GPIO.BOARD)
	GPIO.setup(22, GPIO.IN)
	GPIO.setup(24, GPIO.IN)
	GPIO.setup(21, GPIO.IN)
	GPIO.setup(19, GPIO.IN)
	GPIO.setup(23, GPIO.OUT)
	menu()
	game()

main()

Learning how to use GPIO

GPIO is very cool feature. When I managed to light a diode using it, I decided to check how input works. I made such configuration with switch, diode and resistors:

We’ve got now four wires connected to our RPi – one is ground (GND), one is power (VCC 3.3V), one is output (PIN23) and one is input(PIN24).  The only new thing, when we compare this to configuration from last post, is that now we have a switch connected to the input. Don’t forget to connect it from PIN24 side to GND with 10k resistor. This is how you should connect it to RPi:

Now it’s time to write a python program that will handle it.

Type in console:

cat > button.py

You will create a new file and start to edit its contents so type then:


import RPi.GPIO as GPIO
GPIO.setmode(GPIO.BOARD)
GPIO.setup(23, GPIO.OUT)
GPIO.setup(24, GPIO.IN)
test = 0
while True:
           if GPIO.input(24):
                GPIO.output(23, True)
                if test == 0:
                             print 'You pushed the button!'
                             test = 1
            else:
                GPIO.output(23, False)
                test = 0

Then press ctrl + d. You can do that of course with any text editor you want (nano for example). Just make sure that file have such content.

Try to run it:

python button.py

Now if you press the button the led diode should light up and you should see on your screen a message.

Preparations for using GPIO on Raspberry Pi

While I’m waiting for the very last parts for my balloon project I decided to test GPIO interface on RPi. My objective was to light LED diode from a python console. I’ll show you how to that step by step.

There is webpage which really helped me, you can find schematics of GPIO pins there: LINK. There is my RPi with one of these schematics:

Carefully connect one wire to 3v3 output and one to GND. There is simple schematic for that:

Then you need to connect it to LED diode and 100Ω resistor if you are using red diode. Remember that longer leg is cathode (+) and shorter is anode (-). It should light up.

If you are using other type of LED diode you need to check it’s voltage and then do some calculations to select suitable resistor for your configuration.  You can use special calculator to do that or count that in old-fashioned way by using that formula:

R = (Vs – Vl) / I

r – resistance that you need

Vs – supply voltage (3.3V for us)

Vl – diode voltage (about 2V)

I – LED current (0.02A)

So let’s calculate this:

R = (3.3V – 2V) / 0.02A = 65 Ω

I used 100Ω for that so my diode is a bit subdued. It’s OK to use value that is higher than outcome of calculations.

If everything is working as described you can move to the next step.

Now we’re going to move one of the wires (this that is providing power do not move the grounding one) to pin 23 (GPIO11), there is schematic for that:

After you do that, your diode shouldn’t be lighting any more. Now we need to prepare Python.

At first we need to install python-dev package so type as root:

apt-get install python2.7-dev

Then download class which is able to control RPi’s GPIO. You can find it there: http://pypi.python.org/pypi/RPi.GPIO/0.3.1a#downloads. Unzip package:

gunzip FPi.GPIO-0.3.1.tar.gz
tar – xvf FPi.GPIO-0.3.1.tar

Then get into new catalogue:

cd FPi.GPIO-0.3.1

and type as root:

python setup.py install

GPIO class will be installed and you will be able to use it inside Python Shell. Let’s test if it is working!

Run Python 2 shell by simply typing:

python

 Be sure that you are using Python 2 not 3! It should be set do P2 on default. You can use for that also dedicated program when x server is started (you’ll find it under Programming section in LXDE menu).

After starting Python Shell your command prompt will change to:

>>>

Type there following commands:

import RPi.GPIO as GPIO

GPIO.setmode(GPIO.BOARD)

GPIO.setup(23, GPIO.OUT)

Now observe your carefully diode and hold back the excitement! Type that command to light it up:

GPIO.output (23, True)

Congratulations! You just used your RPi to manage a low level peripheral! You are only one step from building a really advanced devices!

Using motion to stream image from a webcam

Motion is probably best capturing software if you need to store and stream image from webcam connected to your Raspberry Pi. It don’t consume much ram and it is fully configurable. To install it on Raspbian simply run as root that command:

apt-get install motion

Ok, we’ve got it installed. Now it requires little configuration. Edit /etc/motion/motion.conf with your favourite text editor (I use nano). Everything there is clearly described so I’ll show here only the most important options and describe some of them.

Motion should automatically detect your video device, if you’ve got more than one connected to RPI change that value. To check all of them type:

ls /dev/video*

  • width and height

These values are based on parameters of your webcam.

  • framerate
  • minimum_frame_rate

If you want to stream image slower than 2 fps put there value that in equal to number of seconds you want to wait between every capture.

  • ffmpeg_cap_new
  • ffmpeg_video_codec

That is useful only for those who want to keep not only images but also video. I turned it off on my device. To use it you’ll need to have ffmpeg installed.

  • target_dir

Location where motion will store its files. I strongly recommend to change default setting because /tmp on Raspbian is mounted on smaller partition (about 60MB). /tmp is also automatically cleaned during every booting so if you can easily lost your photos.

  • webcam_port
  • webcam_localhost

Set it to off to be able to connect from another computer.

  • control_port
  • control_localhost

You can use that to manage motion from another computer without editing motion.conf.

Save file (if you’re using nano press ctrl + x). Now type in console:

motion

After that you should be able to connect to it with your browser. Just type its address and port, for example:

192.168.1.67:8081

Image

Image

Working on your Raspberry Pi without using any peripherals

Raspbian has SSH daemon installed by default. It can be used to work on our RPI when we have no possibility to use any kind of control device. It will be also very useful for my balloon project which is actually almost completed. I’ll show you everything in the next post. This one is actually about Linux basics so if you are user of this system, you’ll find probably nothing helpful here.

Let’s start from checking IP of your device. Assume that it is connected to our local network. There are two options of checking its address. You can find it in managing page of your router or whatever you use. You can also use very useful command:

ifconfig

It shows configuration of your network devices. As you see I am connected through wlan, so interface I’m mostly interested in is wlan0. It shows the local address in inet addr field.

Image

Well. I’m already connected to my RPi from Windows 7. To do the same, download PuTTY there: http://www.chiark.greenend.org.uk/~sgtatham/putty/download.html.

After doing that simply run program and you’ll see something like that:

Image

Type RPi’s address in Host Name field and click Open.

Then you can login into you account. By default it’s:

username: pi

password: raspberry

On your first connection you’ll need to accept RSA key.

On Linux or OS X connecting by ssh is even simpler. You need only to type in console

ssh username@host

In my case it would be:

ssh pi@192.168.1.67

Then you need to accept RSA key on first connection and give password on every.

Writing dice rolling ircbot in Java (Part I)

Some time ago I needed a bot for rolling dices. I found only one, written in Ruby, which I don’t know at all. That determined me to write my own bot. In that time I was working on Bukkit plugin so I decided to stick to the Java. I found out that there is magnificent API called PircBot. I’m going to show how use it to write your own bot.

Environment I use is Eclipse. I’ll also show here how to configure it.

Let’s begin with creating new project.

Image

Name it and click Finish.

Image

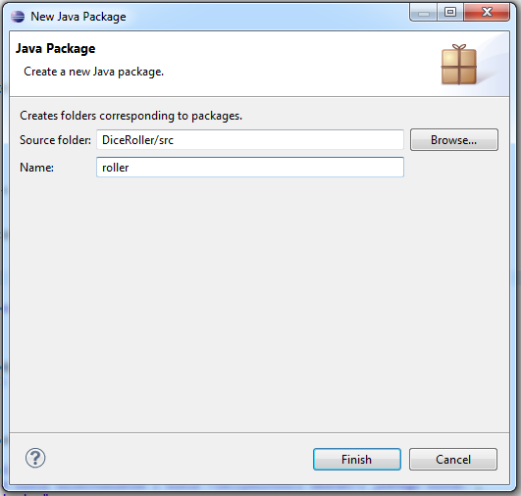
Now you need to right click on src and choose New > Package.

Image

Name it as you wish and click Finish.

Image

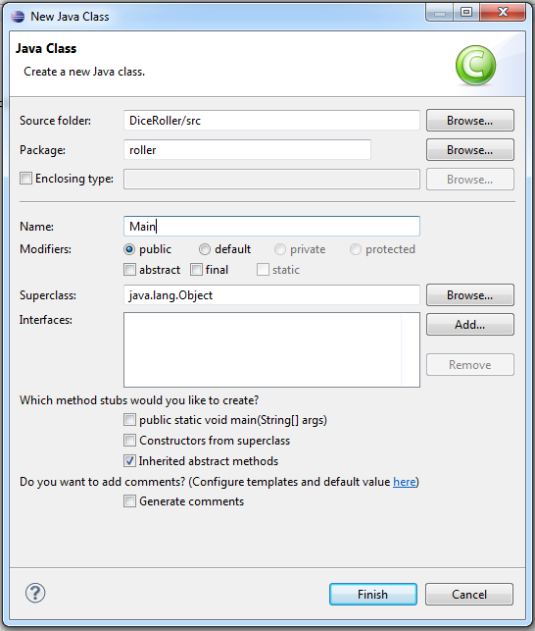
Now click with your right button on fresh package and select New > Class. Let’s call it Main to keep everything clear.

Image

Before we start writing our bot we still need to do couple formal tasks. We’ll start from importing PircBot jar to our project. Download newest version of it HERE. When I am writing that article, the newest version is 1.5.0. In archive you will find jar file and folder called javadocs. Let’s start from importing jar to our project.

Click with right mouse button on the top of DiceRoller tree and choose from context menu properties. Then  go to Java Build Path and click on Add External JARs… there.Image

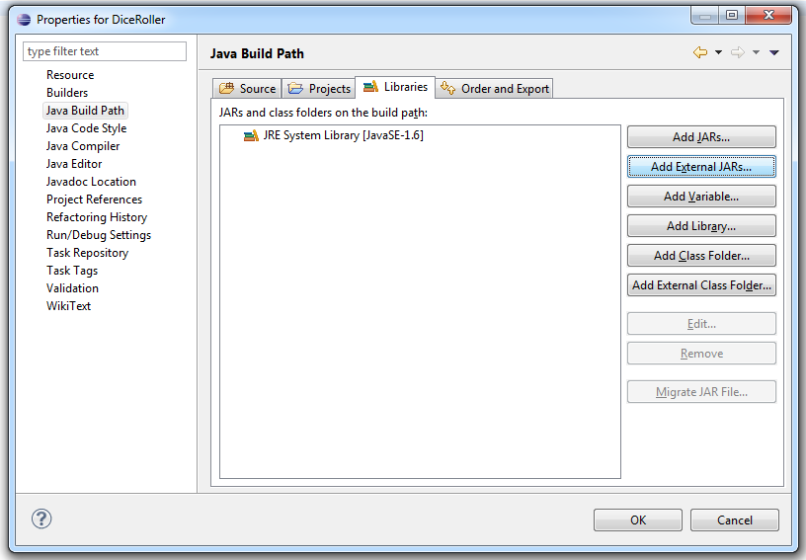
You’ll see window in which you need to show Eclipse localization of pircbot.jar. To maintain order keep it in Eclipse workspace folder. After doing that you should see something like this:

Image

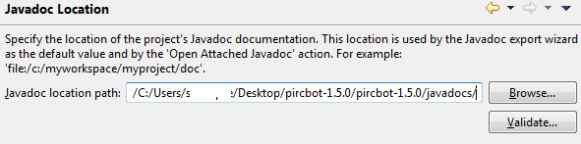
Apply if asked for and go to Javadoc Location now. You’ll find it in same window on left side. Browse again to find its folder.

Image

And there is last thing to do in project properties. We need to show Eclipse which class is our main. But we can’t do yet, we need to write our class.

Close that window and make sure that you are editing Main.java. Inside public class paste this:

public static void main(String[] args) throws Exception {

MyBot bot = new MyBot();
bot.setVerbose(true);
bot.connect(“irc.server.you.want.connect.to”);

bot.joinChannel(“#somechannel”);

}

Eclipse will show you that error occurred but nothing to worry about. It’s because we are referring to non-existent class. It begins with throwing exception mechanism. Java needs to have some instructions held inside it in case there will happen exception. Then we invoke new class, then turns on errors visibility, then connecting to server, then join specific channel.

That is everything we need in our Main class. Now let’s create new one called MyBot.

Begin with adding extension to public class MyBot, modify it like this:

public class MyBot extends PircBot {

}

Now Eclipse should highlight PircBot and show such message:

Image

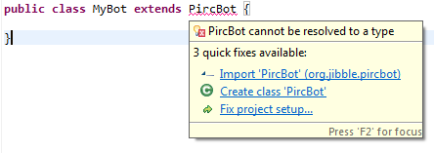
Click on Import ‘PircBot’ (org.jibble.pircbot) and… It’s done! New import just appeared:

import org.jibble.pircbot.PircBot;

If you copied public class code from here Eclipse could automatically did that import, there is nothing to worry about. Just be sure that you’ve got such import.

Now we need to name our bot. But this inside public class MyBot:

public MyBot() {
this.setName(“Bot”);
}

So whole code should look like:

package roller;

import org.jibble.pircbot.PircBot;

public class MyBot extends PircBot

{
public MyBot()
{
this.setName(“Bot”);
}
}

We’ll. That’s the moment when we can finally check how our bot works.

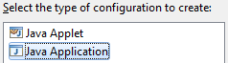
Remember how we were editing project properties? Let’s go there again. Choose from the menu Run/Debug Settings and then click on New… button.

Select Java Application and click OK.

Image

New window will appear. Call it somehow and then click on Search… button.

Image

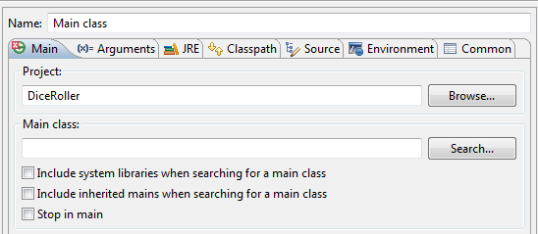
In new window you should see you main class. Double click it. Apply and exit. Now we are ready to test our bot out. Right click on your project in Package Explorer on left side and choose Export. Double click Runnable JAR file.

From launch configuration chose class we set as main. In library handling select the option in middle. Choose your export destination and click Finish. That’s it.

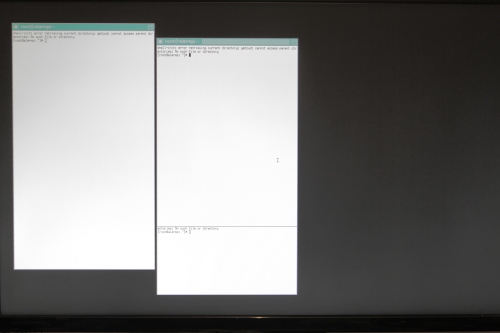
Now we need to run it. Connect to server and channel you selected for that test and run command line. Go to catalogue you’ve saved your bot and type:

java -jar bot.jar

In couple seconds bot should appear on channel.

Whole code of MyBot.java:

package roller;

import org.jibble.pircbot.PircBot;

public class MyBot extends PircBot {
 public MyBot()
 {
  this.setName("Bot");
 }

public void onMessage(String channel, String sender,
 String login, String hostname, String message) {

}

}

Mechanism of rolling dices will be shown in part 2.

Changing keyboard layout on Raspbian

Default keyboard layout can found out as strange to some users. This can be fortunately fixed really fast.

1. Edit /etc/default/keyboard file:

sudo nano /etc/default/keyboard

Change value of locale to yours.

2. Use Debian’s manager to set layout:

sudo dpkg-reconfigure keyboard-configuration

3. Your keyboard layout should be already set but if you’ll reboot device now it will take ages to end booting. OS will be doing remap at every start. To hold this back use just once setupcon:

sudo setupcon

4. Reboot and be able to use special characters.